I noticed in how to trap with diskord he had yellow waveforms in his arrangement audio clips. Mine are just stock black and in live 10’s prefs look and feel i only see a way to change track/clip borders not the waveforms themselves. How did he do that?
Hey @debartello
Maybe this has been done using a custom skin in Live & then playing with the colors settings in the Look & Feel Live’s Preferences afterwards, can’t tell for sure, I will try to find out more & let you know if I do.
Hi again,
Couldn’t find something relevant so far which makes me think about the use of Custom Skin or tweaking the .ask = ableton skin file (contains the colors of Live’s Graphical User Interface)
Opened a ticket with Ableton Support, here is a copy & I’ll let you know if I received any answer ![]()
Cheers !
Audio Waveforms Colors in Live 10
Hello !
If you refer to the attached screenshot you can see that this user was able to modify the audio-clip ( & also midi-clip ) view & colors instead of the standard “plain black color” display of the audio waveform. ( BTW :This version of Live from which the screenshot was taken is prior to Live 10 but I can’t tell the exact version ).
Since I couldn’t find any way to achieve this playing with the available colors settings in the Look & Feel Live’s Preferences, I would like to know how to do this and if it was achieved by using a CUSTOM SKIN or any Options.txt files command that I would not be aware off ??
Would appreciate to have some feedback about this, many thanks & have a great week !
Regards,
Stéphane
Attachments
Screen Shot 2018-05-14 at 08.06.10.png (2 MB)
Stéphane “Tekalight” troubleshooting master
I very much appreciate your effort with this,
high contrast waveform colors would be so much easier for me to deal with especially when zooming in a lot.
Hey @debartello
My ticket with Ableton Support is still pending open…
But meanwhile, since I’m pretty sure this was achieved using a custom skin ( theme file ) within Live 10,
I started to dive a bit more into it and came out with some results, but that’s gonna give you some reading
as well as some home work man ! ![]()
-
Please bear in mind that even if I’m willing to help as much as I can, I won’t be able to provide you paracetamol or any medicine to cure the headache that the following reading could cause !!

So let’s get started, right !?
I’m gonna stick to Live 10 here, just because the layout has changed a bit in this version & obviously, previous Custom Skins made for prior version up to 9.7.6 won’t perfectly match Live 10 edition. Next to that, the general idea & principle is the same.
- What’s a Live “Custom Skin” ?
It’s a MODIFIED LIVE THEME file that defines the look & feel of Live, mainly the Colors & Opacity settings ( to keep it simple ). Live Theme Files are referred as Name.ask files ( meaning ableton skin I suppose ).
- Where to find Ableton .ask Theme Files ?
Live comes with some default themes files and assuming you’ve done a default install :
-
on Windows you’ll find those under : C:\ProgramData\Ableton\Live 10 Suite\Resources\Themes
-
on MacOS you’ll have to right click on Live icon from your Applications folder, choose “Show Package Contents” and from there the path will be Contents/App-Ressources/Themes
So once you’re in that Themes Folder, you will see a bunch of .ask files like 00Light.ask , 01Mid Light.ask …etc. Those are the default themes files.
Since we are going to make a custom one the first thing you want to do is to COPY and RENAME one of these theme files. In this example I will use the default 01Mid Light.ask file, copy it and rename it Test.ask (the number is just to arrange them, it’s not mandatory but you could as well name it 05Test.ask if you want ).
- How a hell can I edit those .ask Files ?
You will need a Plain Text Editor to edit those files, though the default Notepad or Wordpad on Windows should be working, if you use a standard text file editor on Mac it might happen that once you’ve modified & saved your .ask file and try to load it via Live’s Preferences it won’t work saying that the file is corrupted. I’ll be using “Brackets” under Mac here, it’s free but here is a link to some Plain Text Editors. ( Mac only sorry )
So now you’ve got that Plain Text Editor just go to your new Test.ask file and right click/select “open with” & point it to your editor or open your editor first and choose file/open from there and browse to your Themes folder & Test.ask file.
So the file should open ( grab a glass of fresh water & your first paracetamol ) and here you go , welcome inside Ableton Live’s Theme File…

The screenshot stops at line 90, there’s 920 lines of those… ![]()
But OK, even if this could be intimidating & confusing, the overall principle of this file is quite simple.
Let’s take the following example : ( removing spaces and the > and / signs since the text editor here takes it as code )
MeterBackground
R Value=“40”
G Value=“40”
B Value=“40”
Alpha Value=“255”
MeterBackground
So in this example, Meter Background is the customized element that could be tweaked.
R, G, B values are 3 values that together defines only ONE COLOR
Alpha Value refers to the Opacity/intensity of this color. 0 being week & 255 being strong. ( Not sure if 0 implies transparency or no color )
So basically, the all Test.ask file contains just the same information, but there’s a all bunch of elements divided into similar sections that refers to all customized elements within Live’s end user interface.
- So, what is what ?
Well, grab your second pill because no ones is gonna tell you… Some elements description are somehow self explanatory but some others will imply your best guess or a much more weird naming… Unfortunately I couldn’t find a reference sheet for those, in fact you’ll have to tweak the color and see the result in Live’s interface at some point, so it’s a kind of trial & error work, more or less tedious depending of how much you want to customize Live.
- How to change colors & find the RGB Values ?
2 Options for that one :
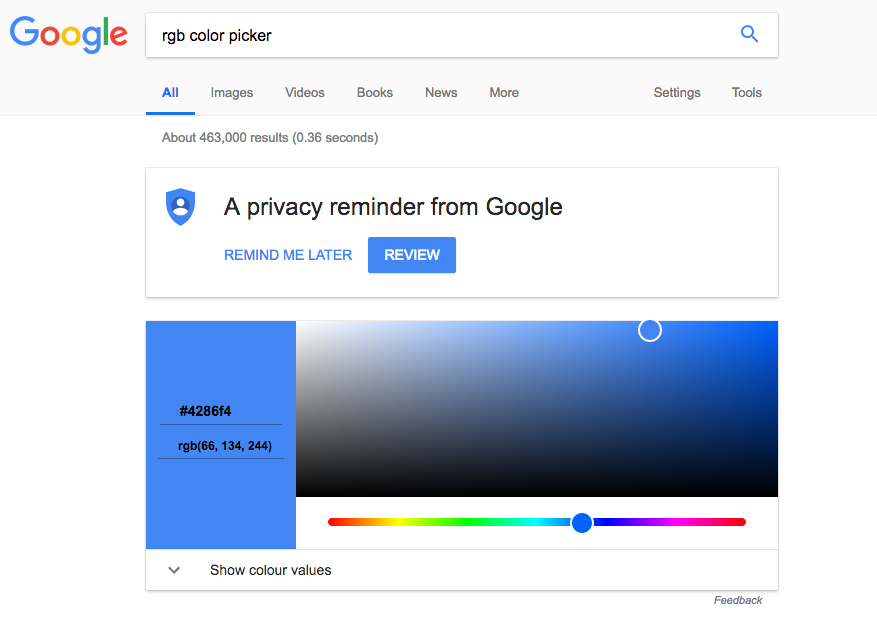
1- just Google rgb color picker and you’ll end up with this online color picker tool
2- Or work the other way around and use this link https://imagecolorpicker.com/ where you can upload a picture ( let’s say a Live 10 screenshot ) click on one color within that picture and it will return you a RGB code with your 3 values.
Both methods could be handy at certain point.
- Then what ?
Once you found the color that you wish to apply to one element, it’s just a matter of replacing the default RGB values with the new ones matching your desire color, you could play around with the “Alpha” value to make this color more or less strong and then you save your Test.ask file with your Plain Text Editor.
Open Live and go to Preferences/Look Feel and select your Test.ask file from the Theme List.
Result is immediate, you don’t need to restart Live each time, however you’ll need to Open/close the Preferences or switch from one theme to another in order to see the changes each time.
So now it’s a matter of finding the element matching the Audio Waveform, I’ll break this into a new post where there will be some candies to make you forget the bad taste of paracetamol, but hey if you got this so far, your now almost a Live 10 Custom Skin Guru !! …and that is a cool feeling ![]()
'till next post then !!
1 Like
OK, let’s go further with trying to tweak the WAVEFORM color in Live…
So once you first open your Test.ask file ( copy of the default 01Mid Light.ask ) you’ll need to use the find function of your Plain Text Editor and perform a search for guess what… waveform
You should end up with this section starting at line 400 until 405 :
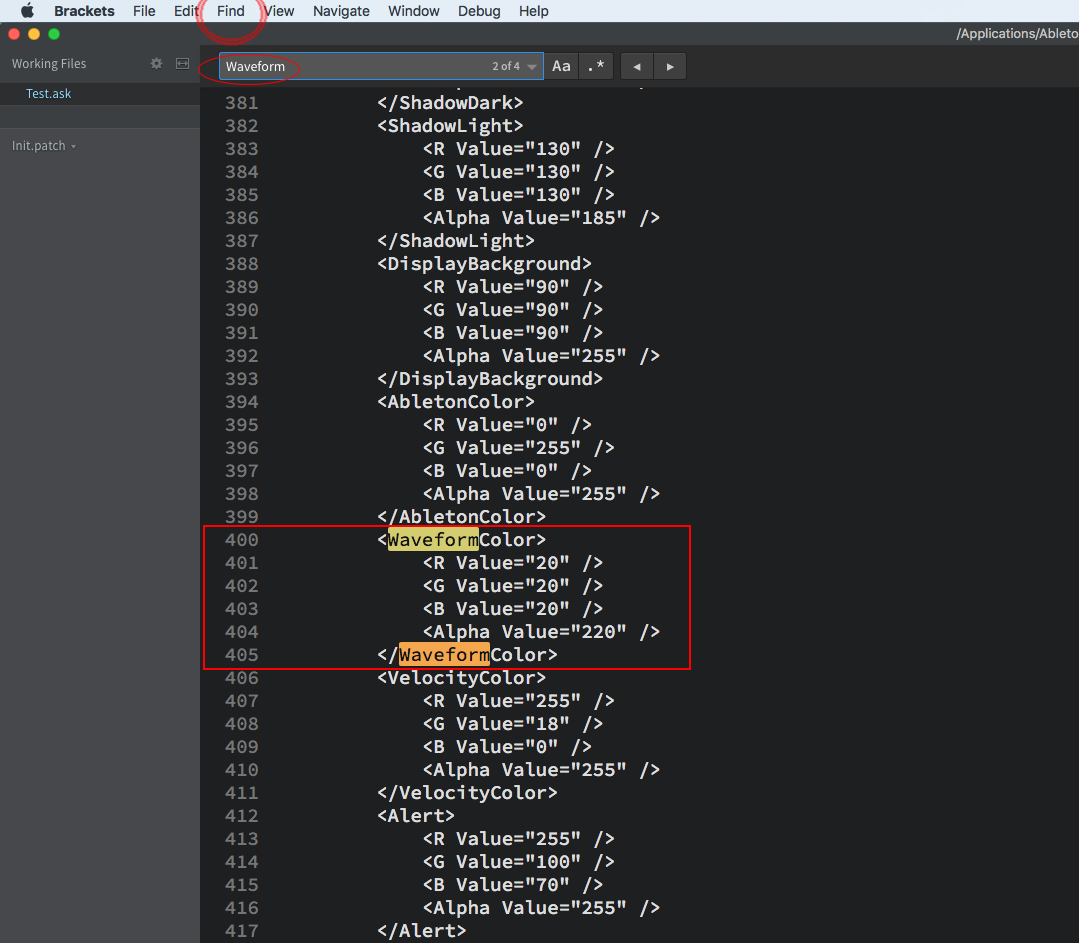
As you can read, the default RGB values are all set to 20 which is matching the Black Color

From Google RGB Color Picker you just have to move the slider and the dot in the color window to find a new color that suits your need, let’s say a sharp greenish yellow like this maybe
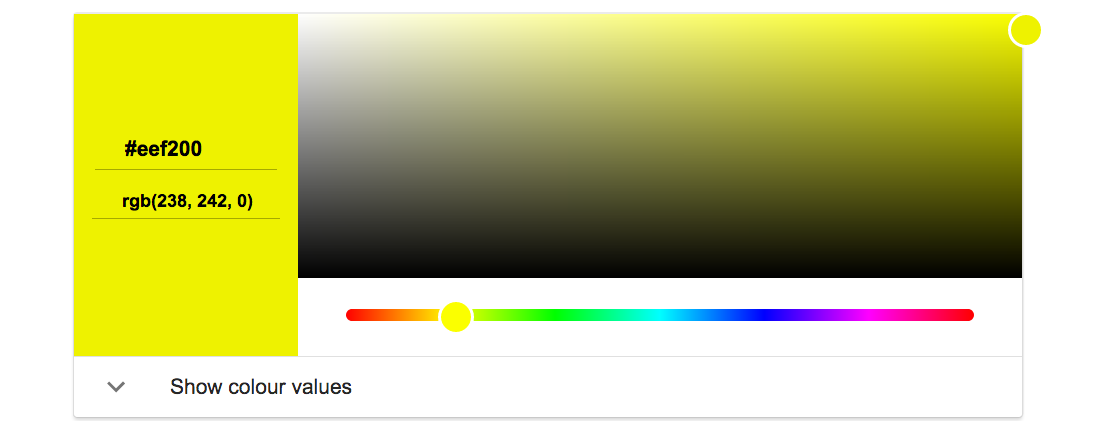
So the RGB Color Picker is now giving you the following value : 238, 242 , 0 that we will use to replace the previous 20 ones in this respective order, and we’ll also change the Alpha parameter to it’s max 255 value like this
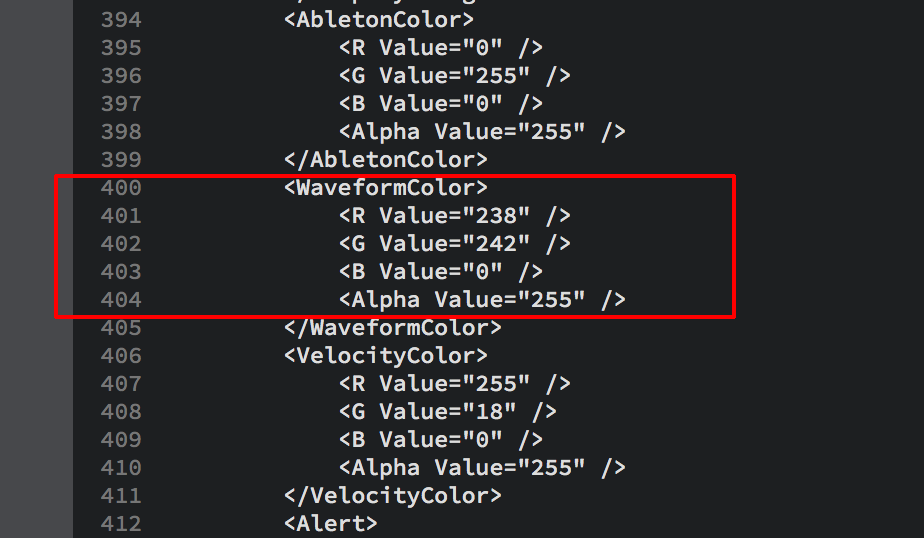
Now we need to click save within the Plain Text Editor in order to save the changes to the Test.ask file we’ve just edited and once done we need to test the results.
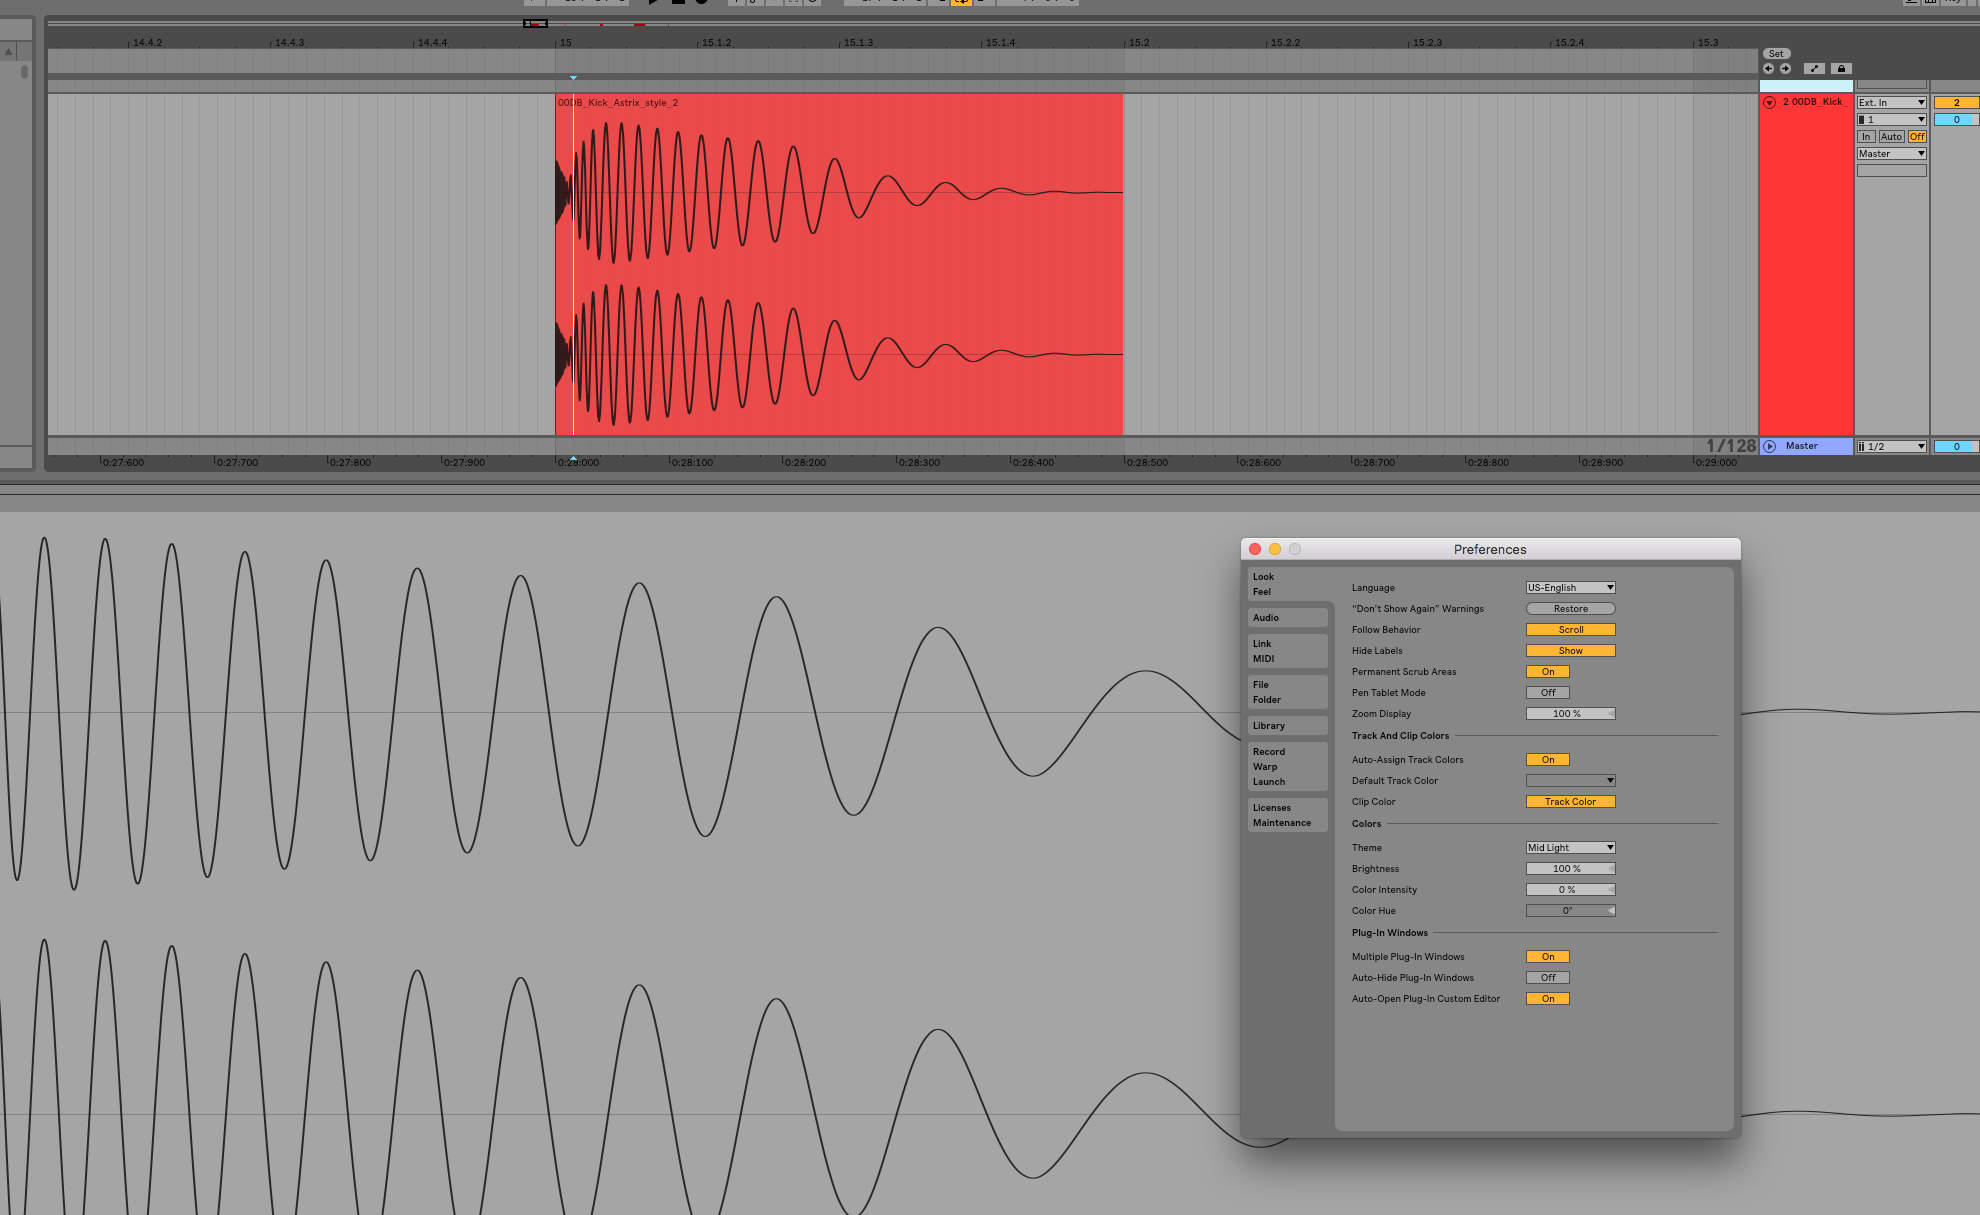
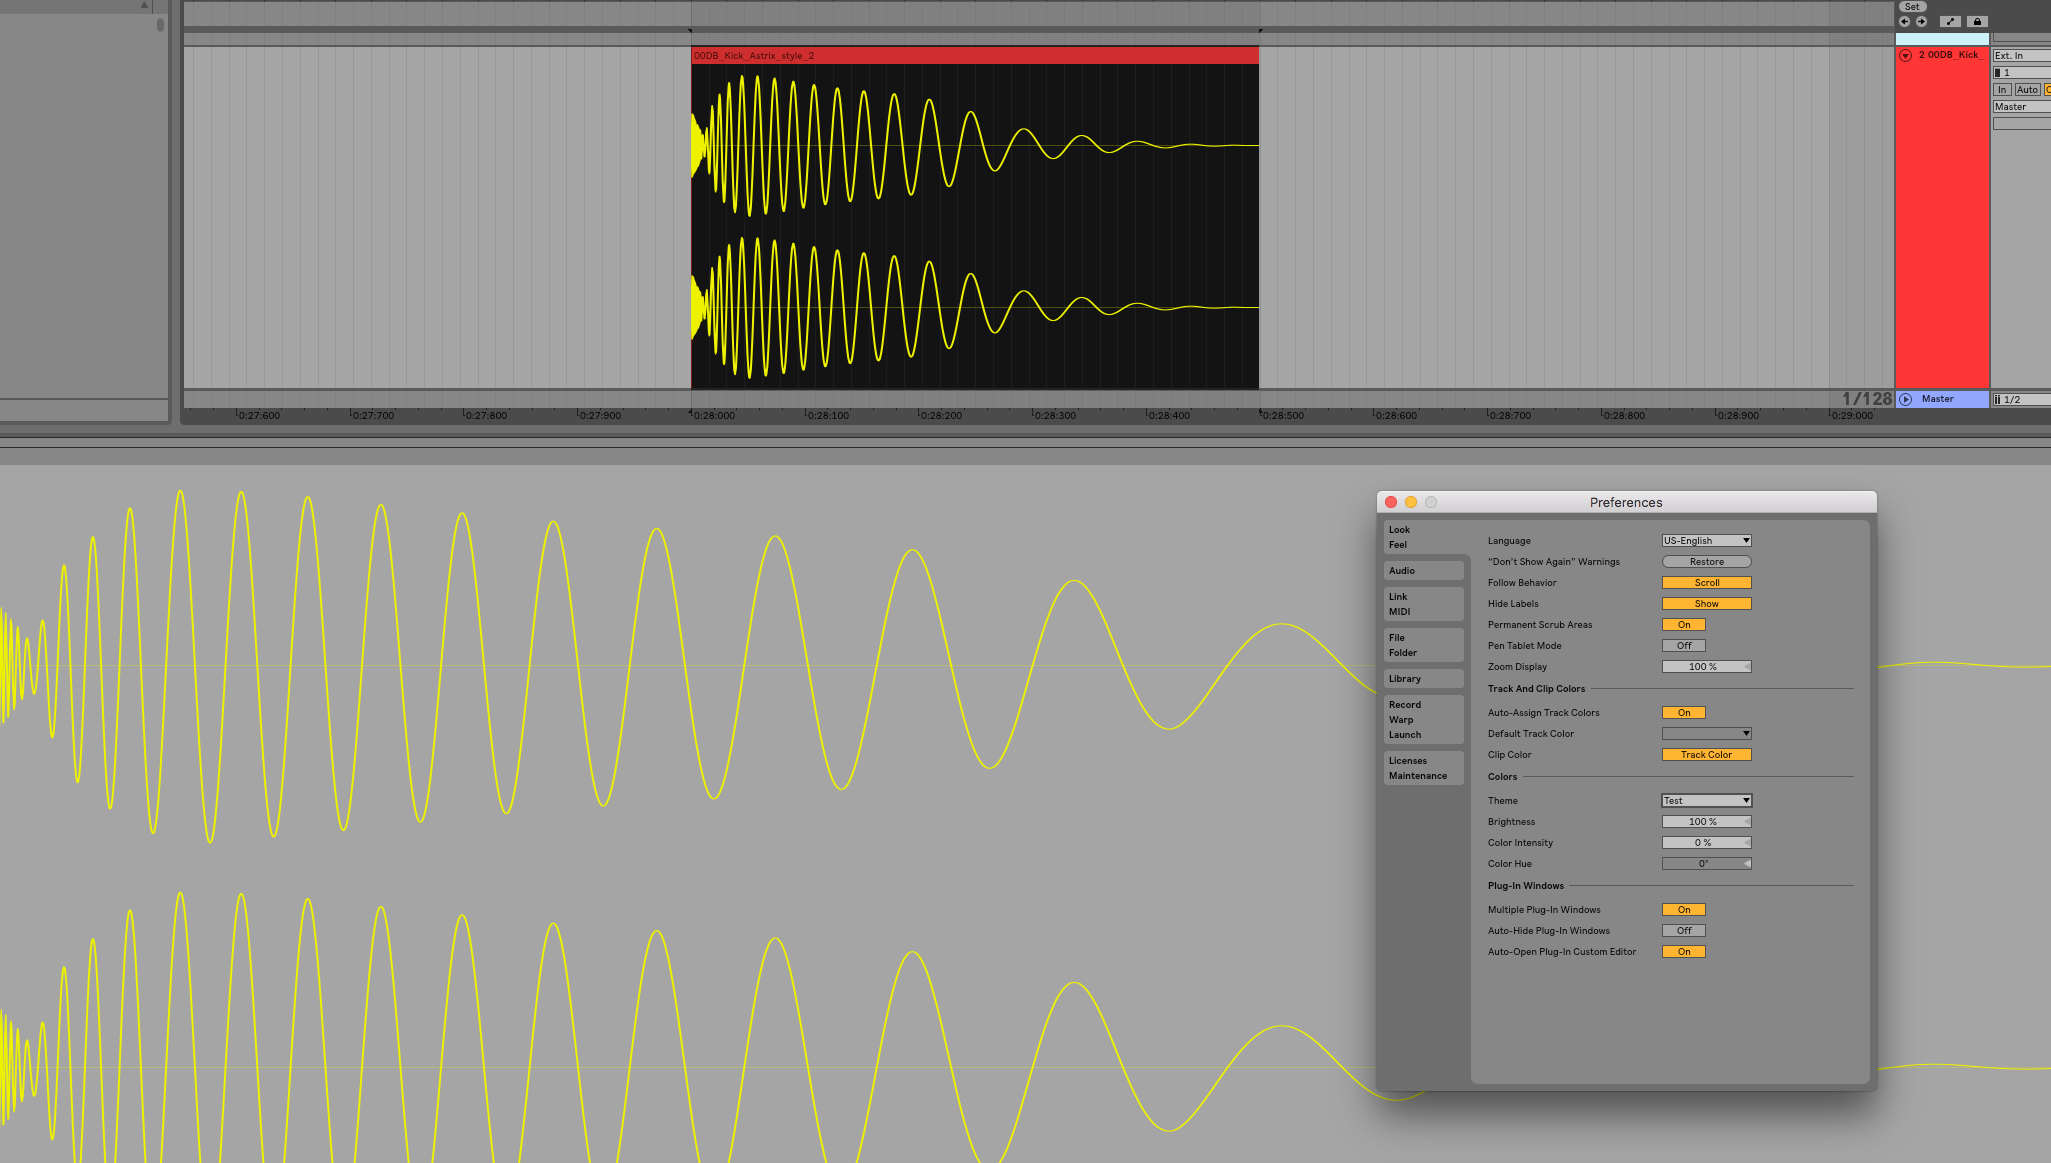
So that’s the default theme we all know ( in this case the track color was set by me to red in Live user interface & the waveform is default black )
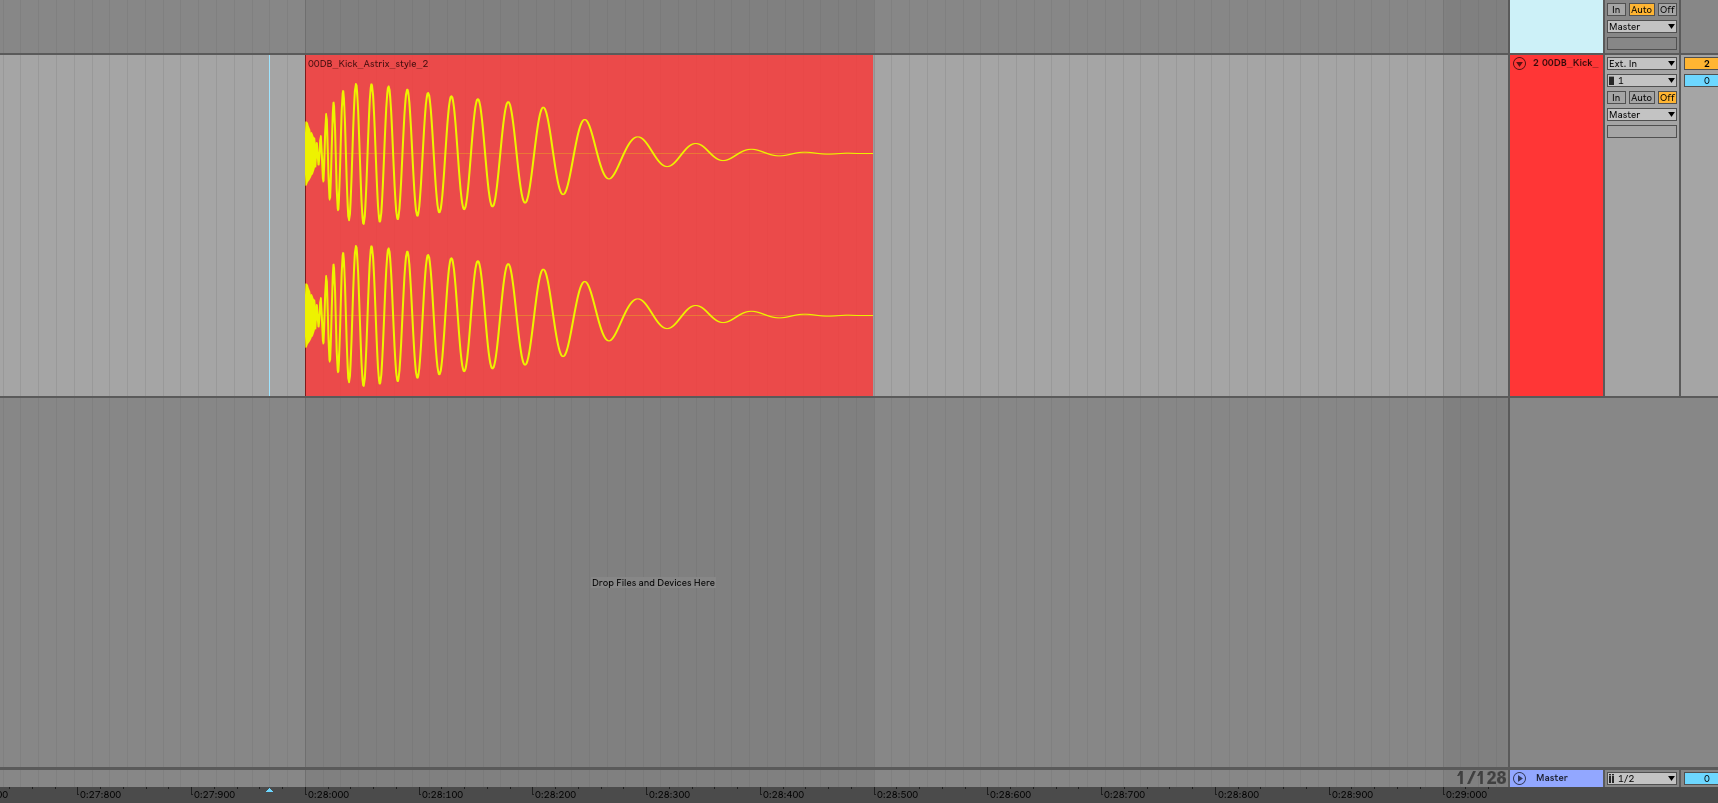
And let’s see what happen when we now load the Text.ask theme from the list
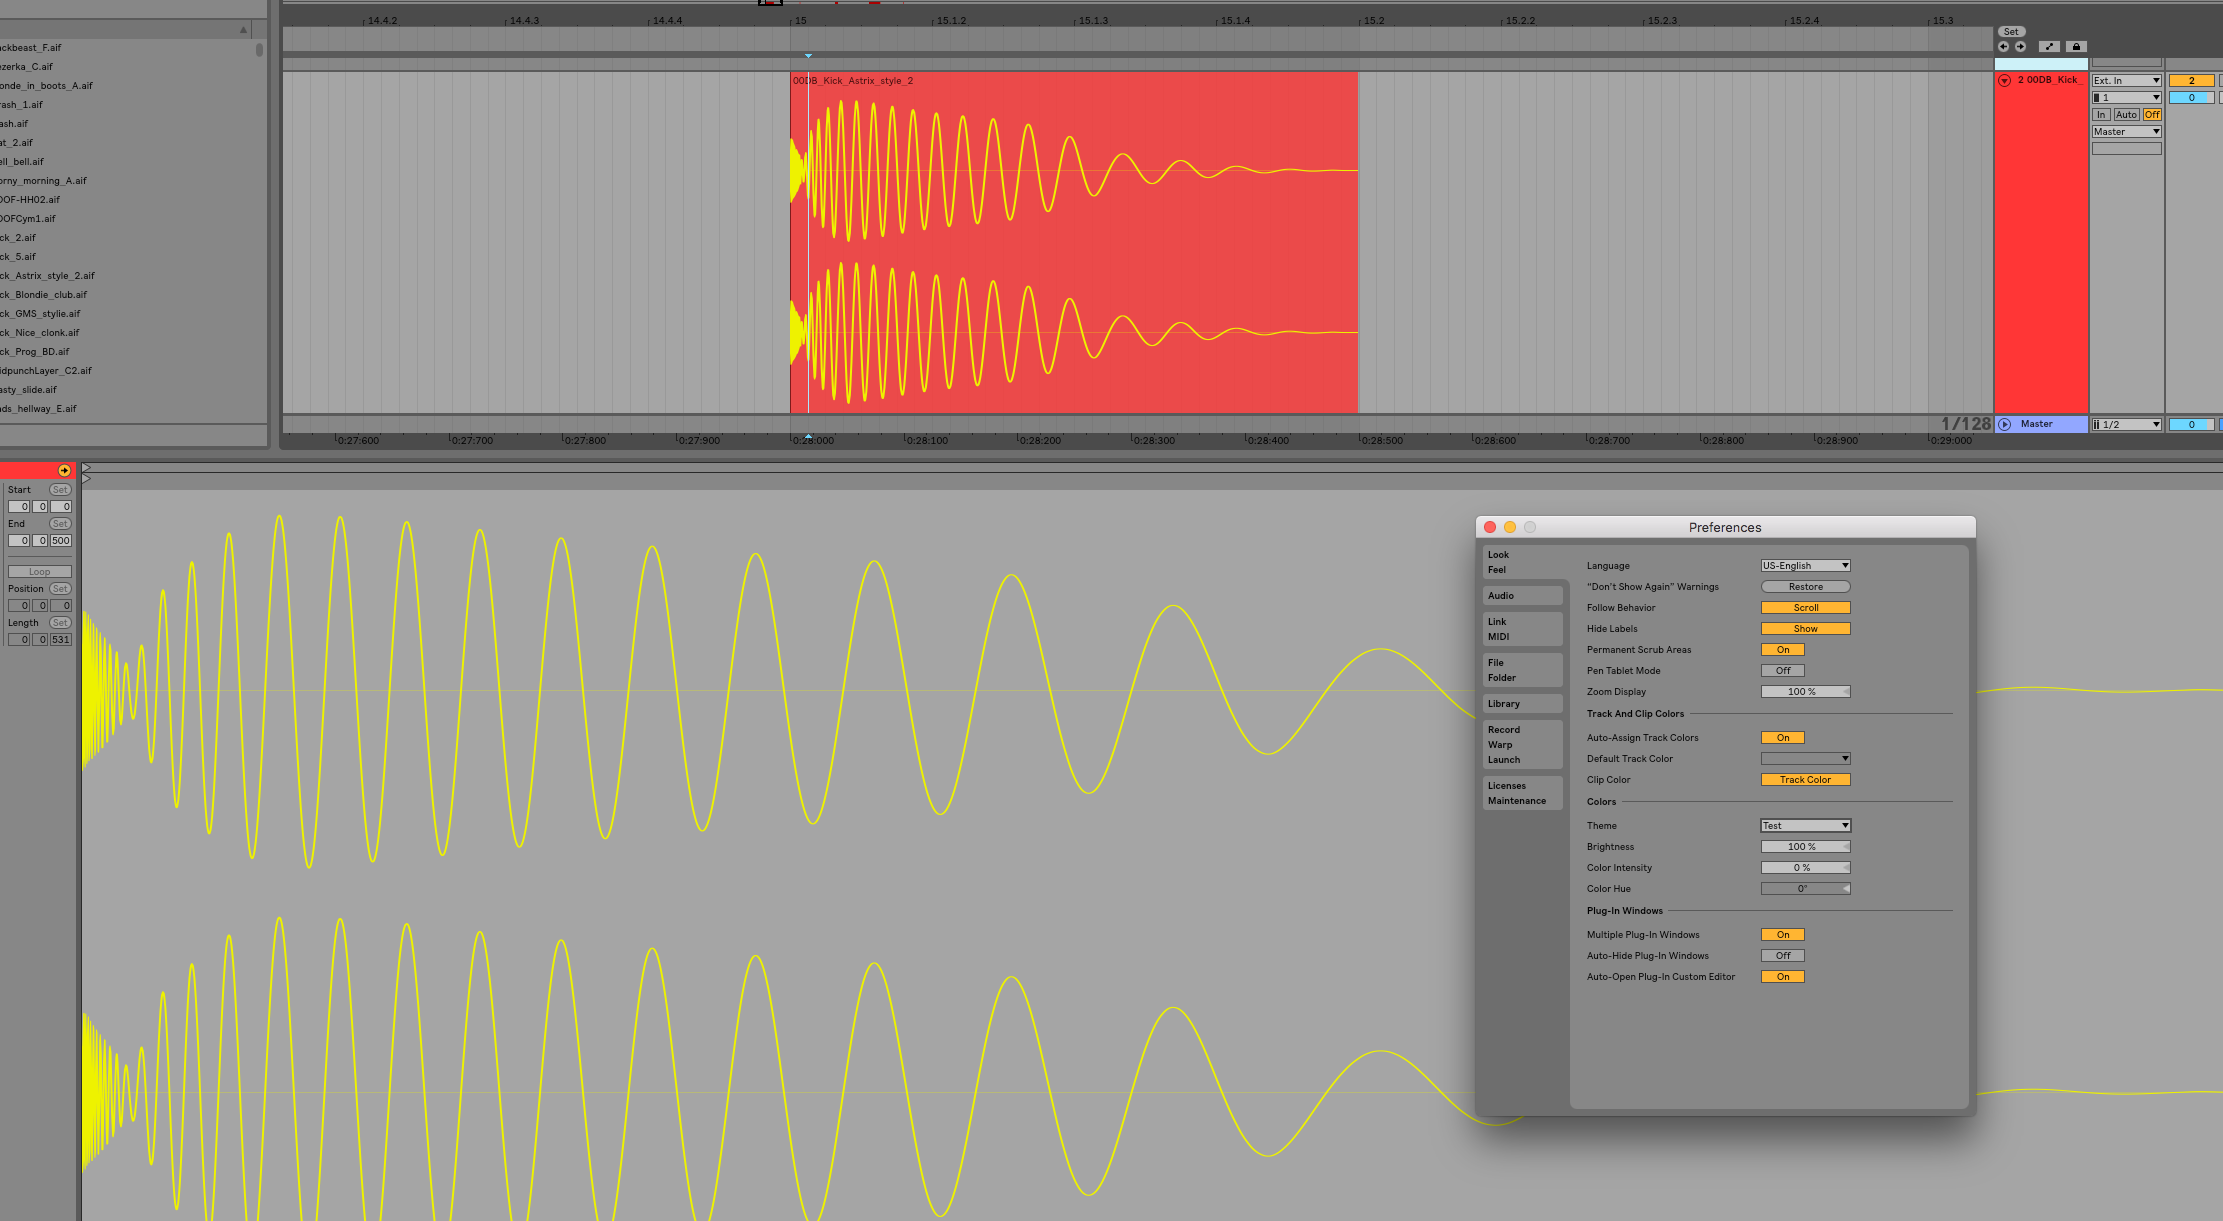
Cool Stuff !! We have a yellow/greenish waveform display now !! I told you you were a guru !! ![]()
But we have another problem now, at this point the audio clip is not selected, so the display in the clip edit window is fine and the clip itself in the arrangement view is red because that is define by the TRACK COLOR ( I made this one red ) but what will happen if I now select this audio clip ??
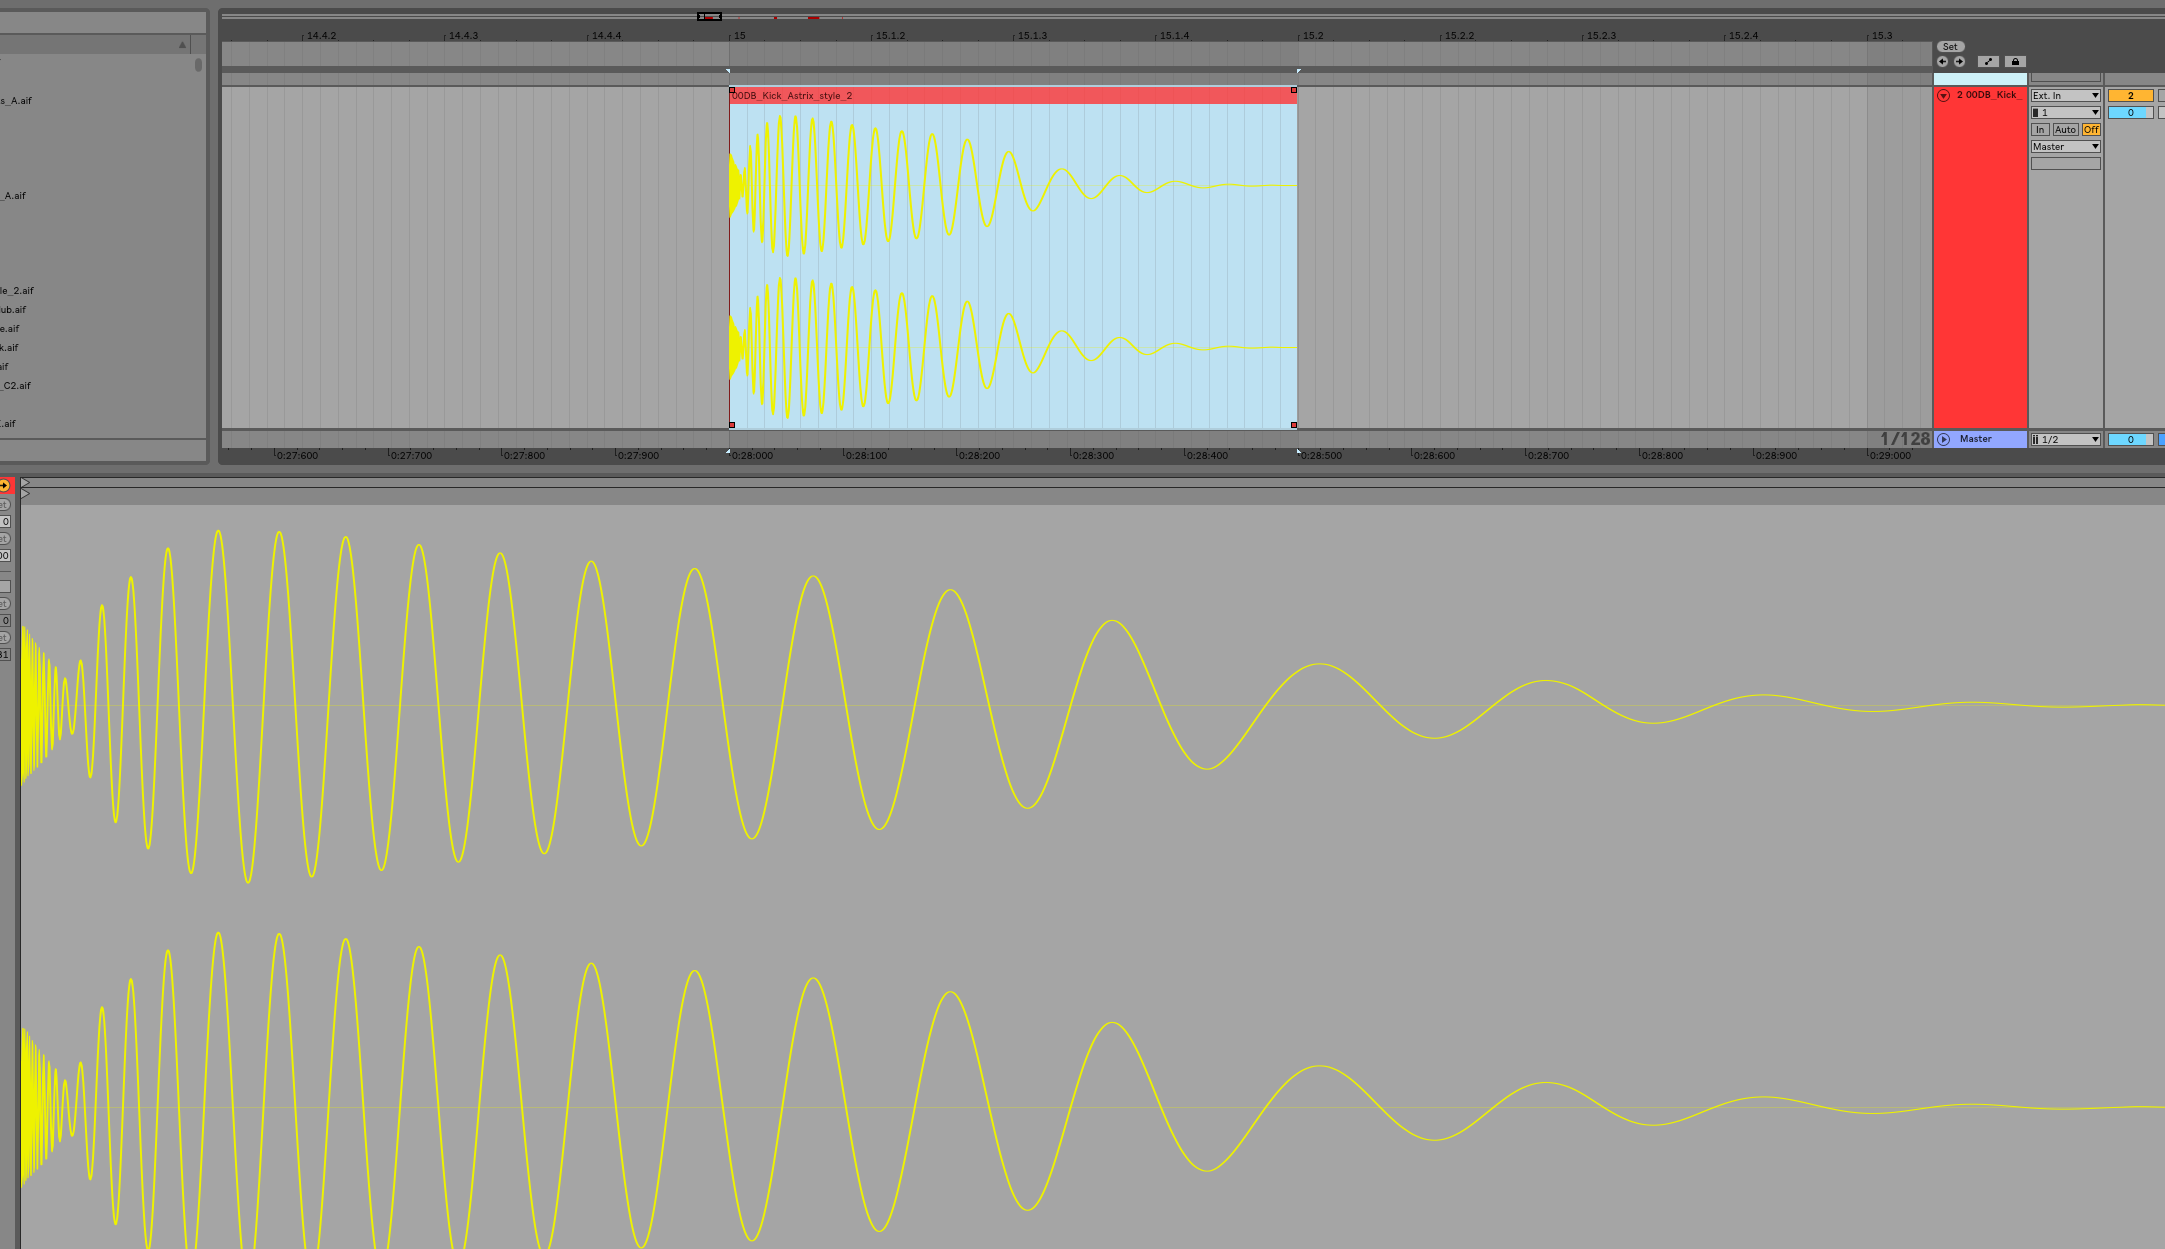
Not the best color display in the world… But still there’s no issue in the edit clip window, but in the arrangement view once the clip is selected, it’s not that great !!
So back to the Plain Text Editor there must be another element matching the clip selection, so this time you’ll have to find the SelectionBackground using the find function of your Plain Text Editor
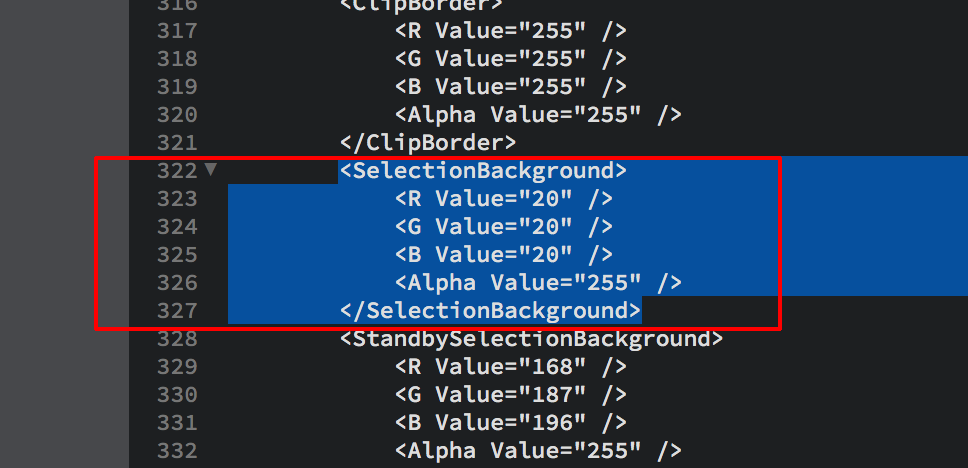
Ok, we’ve got this new element from line 322 till 327 and since I wanted to have it Black this time, I replaced the existing RGB values by 20 for each one, saved the file again and back to Live just switching to another theme & then loading back the Test.ask theme we’ve got this result now
and if I deselect the audio clip, it will be red again ( or matching whatever track color you normally assign in Live )
I’ve been choosing the Black color in order to have a high contrast display but you could very well match your arrangement view background panel color ( grey ) to have a kind of transparency display for the clip selection background.
So you get the picture & the idea, after that it’s a matter of some trial & errors and finding color settings that suits your needs. Next to those basic RGB values & the Alpha parameters, there’s also more advance settings referring to velocity & factors : i.e MinVelocityNoteBlendFactor Value=“0.200000003” but that’s for “BIG SKIN GURU” level… ![]() and probably requires more paracetamol absorption !! I assume those are kind of variable values that will affect some Live’s look & feel features but I couldn’t find what was what, so you’ll need to play around with those if you aim at reaching next level…
and probably requires more paracetamol absorption !! I assume those are kind of variable values that will affect some Live’s look & feel features but I couldn’t find what was what, so you’ll need to play around with those if you aim at reaching next level…
And now since you’ve been a nice student & a good boy, here are the candies…and you’re gonna hate me !! ![]()
-
All from my first post explained in a cool video made by a smarter guy than me,
credits goes to Eric Mitchell.
ABLETON LIVE 10 THEMES - How To Customize + Free Theme DL - YouTube -
Want to make your life even much easier with Live Theme Skinning ??
https://forum.ableton.com/viewtopic.php?f=4&t=229244
Well even smarter than Eric Mitchell are some nice coding skill dudes that have create Live Theme Files Editors !!
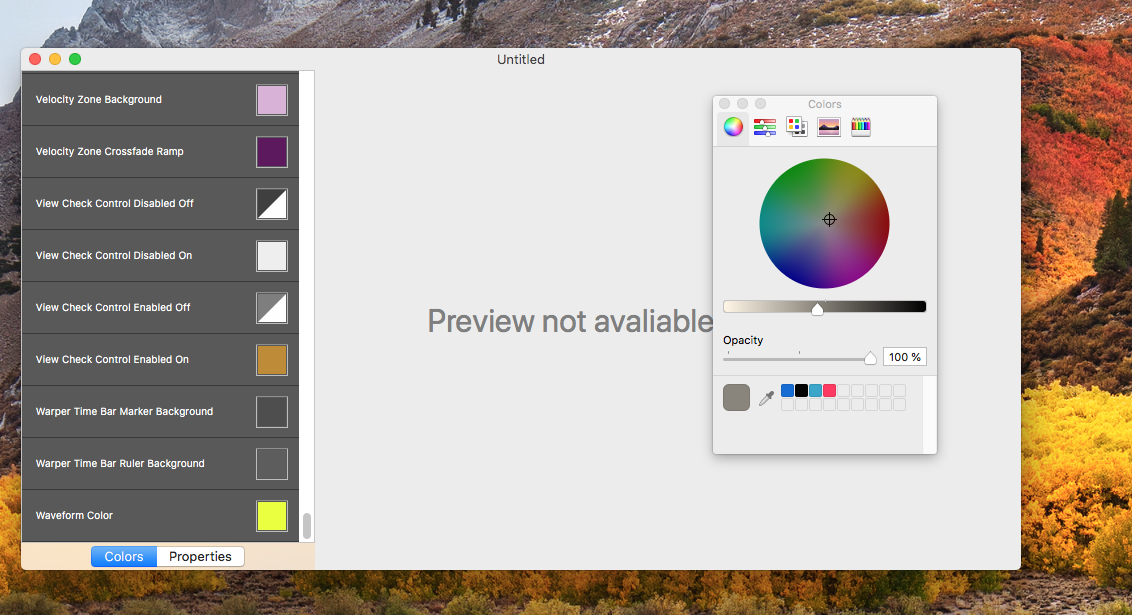
I have tested the PELT one on MacOS ( seems to be available on WIN as well ) & it works just fine, sometimes crashing when you pickup a color but you manage to get the work done. Those pieces of codes are trustful in the way that they just read & write .ask files content. So basically, you open your Test.ask file with PELT, you 'll have a much more readeable display of the elements names, you select one, pick up a color with the color wheel and save your file from PELT again, and your done !! ( Credits for that PELT Editor goes to Brian Williams aka eviathan).
It looks like this, in this screenshot you can see the Waveform yellow/greenish color set at the bottom.
Much more easy, euuhhh ??? ( I told you you’re gonna hate me !! But now you’re a Live’s Skin Guru man, because you learned the hard way … )
Edit :OUPS !! Not yet a Skin Guru… ![]()
If you set the SelectionBackground RGB values to 20 to make it black like I mentioned before, it will also affect the general selection in Live’s interface ( i.e : within the file browser when selecting a sample or a plugin…etc ) so it will completely black out your selection field then !! Not a wise color to go for !! Sorry for that one, like I said before, it’s trial & errors. ![]()
1 Like
You have answered my question thank you very much. I used the editior and now have a yellow waveform so much easier for me to see I love it! As far as manually adjusting the color parameters what a pain in the rump but a good FYI so thanks for that.
I don’t know how I lived without that editor. It is awesome!!!
OK, good to know that you are enjoying this tool & that it worked for you !!
And yes, I could have made the all thing easy right from the start without going into details but at least you know what’s going on under the hood when using this easy editor now, and there’s nothing better than knowing what are doing the tools you’re using… If you browse the Web you’ll also find some free Live 10 Custom Skins, I tried a few but could not find one with this Waveform color tweak.
Cheers !