How To Make - I'd Do It Again with CRaymak / 716

<img src=‘/uploads/default/original/2X/0/0b069ee607f1a8694913e4917ef7bdc59fe21fc2.jpg’ alt=‘I’d Do It Again with CRaymak’>

View Course

This week Sonic Academy proudly welcomes back multi-instrumentalist and genre-merging producer Christien Raymakers aka CRaymak for a brand new mammoth course in How To Make ‘I’d Do It Again’, his new track featuring Saint Yves recently released on Circus Records.

Merging elements of pop and dubstep, this monster track combines both soulful vocals with a wall-of-sound drop full of intricate layers, glitches and effects to create a track of epic proportions to get your teeth into and throughout this course, you’re going to get the full lowdown on how it’s done.

Starting from a blank slate we are given just the vocals and piano midi to work from and watch as Christien begins the task of making it his own. Firstly re-writing the chords we start by building the break, layering pad sounds, writing a counter-melody along with an arp and evolving riser in Serum before adding orchestral percussion and effects.
We then move on to that epic drop starting with the drums before layering in super saws and basslines along with the all-important dubstep glitch fx.
Finally, we take a section of the vocal and use heavy processing to turn it into an effective lead synth before finalising the arrangement and carrying out a master.

Not one for the faint-hearted, this is a highly detailed and intricate recreation of the track with every element (and there are a lot of them!) carefully shaped and moulded to get the right end result.

And if 5 and half hours of music production goodness isn’t enough? What’s this…?

Yup, we’re spoiling you again and hosting another exclusive remix competition!

We have teamed up with Circus Records and after the huge success of our recent contests, we know the standard is getting higher so we’re happily handing this track over to you to make it your own.
So what’s a competition without prizes? Well If yours is chosen by CRaymak you could be in with the chance of getting a release on Circus Records - an opportunity not to be missed and exclusive here at Sonic Academy.

So, ourselves and CRaymak are super excited to see what you guys can come up with - we know you can smash it. You can now download the parts from this awesome tune and start working your magic!
We have shown you how to make the tune, now it’s over to you to get creative, make an awesome remix of this track and show the world your production talent.

Just click the ‘Enter Remix Comp’ button above to find out more! This competition is open to all Sonic Academy registered users.

Contest ends - 2019-08-03 - 07:00:00 UTC
Thanks for this tutorial!

Nice one! Gives me some old-school Seven Lions vibes, which I rate as a very good thing.

Nice!

I don’t have the same files as you in my resources.

Hi there @botsone

Could you be more specific please ? What files do you think you’re missing, you could refer to a video & time frame.
It can happen that the resources files are different, because of rights or Raw files being processed and saved afterwards… Well those kind of things, but it would help to know about what you think is missing in the resources.

There are too many to list. Can we just get the same folder he is using in the tutorial? Literally half the samples, some of the presets, and more are missing from the resource pack that we got.

@botsone

Was not asking for a list but to point to a video number & time frame, I can’t possibly browse through a 5 hours tutorial to try to find out what you’ve been founding missing.

Anyway, I believe I figured it out. Resources files you get with the tutorial are just the necessary files to reproduce the track. It’s pure courtesy of the tutor and NO, you can’t get the all folder a tutor is working with because this could be either it’s own private samples/resources libraries or paid packs that are entitled to a license per user, in which case you won’t have any rights to use them in your own production anyway.

As for presets, tutors can show you how to make them during the course, they can decide to include them in the resources but most of the time they will be available from the DAW project file ( again if presets are coming from a paid presets pack, the licensing rule still applies as opposed to presets made from scratch by the tutors that they decide to share ).

Hope this clarifies why you don’t have the full folder or presets that you’ve seen the tutor using in the videos :wink:

h

cool course!

Hi very cool course, Im really sorry if i missed something but I can’t find how he sidechained. He creates the side chain track and routes the audio but nothing on what he used to create the side chain

Hi there @JvzH

Could you please point to a video Number and time frame ?

Tutorial 07 from 22:40 onwards he creates all the tracks for sidechaining, but what is the actual device he uses to sidechain

1 Like

Hi again @JvzH

Sorry for the delayed reply :wink:

The side-chain is coming from the 3rd party plugin “Volume Shaper” from Cableguys, but the particularity of the workflow and routing used here is that this plugin is actually triggered via Midi. So basically the all side-chain takes place because of the following Audio & Midi routing :

  • You have an Audio and a Midi track inside a GROUP Track.
  • The Audiio Track receives the incoming audio signal → Audio IN
  • It sends Audio OUT → to the GROUP Track itself ( also an audio track, see it like an audio BUS ).
  • On this GROUP Track, there’s the Volume Shaper fx plugin.
  • The plug-in is set to be used in MIDI TRIGGER mode and only works when receiving MIDI IN.
  • The MIDI Track is the Side-Chain trigger, sending MIDI OUT to the plugin.
  • Then the resulting side-chained audio is sent OUT from the GROUP Track to the Master.

So with this workflow, whatever audio signal you send to the AUDIO INPUT track inside this Group passes through the Volume Shaper and if there’s Midi notes on the SC-Trigger then side-chain is applied to the audio but if there’s no MIDI Trigger, then there’s no side-chain taking place.

Here’s an example Midi SC with ShaperBox - YouTube

Wow thank you so much for the amazing response and video. It makes complete sense now. Thank you

1 Like

hey so some of the resources didn’t download right for me (i’m on pc so idk if i did it wrong or what) but when it comes to tutorial 8, i’m trying to add some sounds i’ve made on the fly and i’m getting this awful ringing sound from Ableton’s OTT and I don’t really know how to fix it right now. It seems like when I watch his, his sound seems to stop immediately after the midi note ends, but for me I get this super long tail/almost feedback type sound. Could anyone pls help?

Hi there @release

I would suggest trying to troubleshoot where the problem is coming from, could be your own added sounds ( are you adding a synth plugin ? ) or OTT settings.

From what I’ve seen in the available resources, you should have all Serum presets ( fxp files ) as well as each Live Processing Racks saved as .adg files + the Midi so you should try to replicate with the same serum preset than the tutor first and then replace that with your own sound source and if you’re getting the same ringing sound issue, then it’s likely your own sound causing it.

I don’t think that this is the problem here, and as a subscriber you can simply try to download the resources again and check if that makes a difference, but again, the best way is to be sure to use the matching .ADG + Serum Preset + Midi to reproduce the tutor’s sound and then try with your own sound source.

Keep this workflow to mind : MIDI notes → go Into Instrument Plugin —> go into Effects —> go channel audio output

So a long ringing sound issue could be caused by Midi notes Length, Instrument Plugin preset/settings , effect(s) settings.

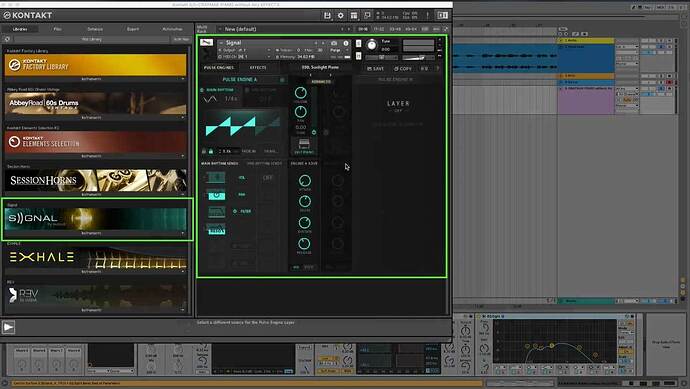
In “writing the break, part 1”, can someone explain what was done in Kontakt when he added “another layer” around 6:50. In particular, what Kontakt instrument was he using and what distinguishes that instrument?

@aNewMillenium3000

At this point of the video he’s not properly “layering” sounds here but just replacing Ableton Live “Grand Piano” that was used to sketch out and create the chords progression with another instrument. Layering is when you stack several instruments ( or audio files ) into 1 group to make 1 sound out of multiple sources.

The sound used is from a 3rd party library for NI Kontakt → “Signal” by Ouput.

You will catch this info if you pause the video at the right time… Don’t rush through courses :blush: :smile:

Also keep in mind that you don’t need to have the same plug-ins or Kontakt Library and that replicating things might not be the best way to get the most out of tutorials.

Work with what you have at your disposal, take your time and try to recreate things from scratch rather than replicate them. Here’s a very good watch about this mind set : Psychology of Learning

Hope that helps :wink:

Cheers !