How To Make - Uplifting Trance 2019 with James Dymond / 804

Again there’s no magic numbers or rules you can apply all the time, it’s different for each sound & project :wink:
It’s not really possible to give you the right advise here to be honest, just more general recommendation.

Using noise and saturation can help the sound to cut through the mix, as well as using filters and EQ as discussed before, but it has to be subtle. Adding delay creates stereo spread and makes any sound more wide, so that’s why it gets worse. If you’re adding too much processing to your sound or If you find yourself having a lot to do to get the right sound to work in the Mix : then maybe it’s time to try another sound or preset.

And as a general advice on layering sounds : you should layer instruments/sounds only if a new layer is really adding something you really want and need to the sound. Not just to make it big or punchy.

This topic is dedicated to James Dymond tutorial, so it’s important to keep it tight to this since comments are also displayed on the main course page. So let’s try to keep things in relation with a video number/ time and precise example that you’re trying to replicate as you follow along the course or with the project resources files.

Hi al,

I’ve tot a small question: James uses mostly the SSL compressor for perc and kicks etc but uses the Vertigo VSC 2 for the mid bass. I can pick up the SSL pretty cheap but the VSC is a lot more expensive.

Can I just use the SSL for every compression also bass or is there a specific reason why to use the vertigo there?

Thanks!

Hi there @Maddox

By the end of the day it’s more about what sound you’re after and what tool you know will suit your need and get the job done quite well. All those type of compressors ( and any other effects modeled after their hardware counterparts ) will transform your source sound in a slightly different way. For compressors, it will depend of the type of hardware they were modeled after : FET, VCA, TUBE … they all have different attack, release and overall response time and you’ll find some models working better on transients and percussive material, other ones working better for bass lines, other ones working better on vocals…etc.

Experiment with what you have, even if you just have stock compressors and plugins that come bundle with your DAW, they can get the job done, but it’s more important to listen and “learn how to listen” to what different compressors are doing to your sound than getting the exact same “expensive” plugins you will see in tutorials.

Tomorrow you might be watching another course and seeing a tutor using an API 2500 or a DBX 160 for his Kick and Bass lines and you’ll feel the need to get the same plugins again, and again, and again…

Like James mentioned in his videos, he loves the sound of these guys, they do the job for him, but it’s more about knowing what you want to add or tame in your sound and what tool you know can do the job for you.

When you can afford to buy more expensive and highly regarded plugins, then do it, but not having access to the same tools as your favorite artist shouldn’t stop you to get similar results, and anyway, by the end of the day, you don’t want to copy-cat someone else’s sound but more likely be happy with your own production.

There’s a lot to grab and understand about compressor types, compression and way to use them, check those courses here on Sonic Academy :

I’m a bit of a perpetual newbie if anyone’s wondering.

It would be nice to have something about how the mid bass presets are made, or where to get them from, and/or how to make them with other synths. I always find I can’t get my basses to sound like they do in this tutorial / much commercial trance. (I don’t have Sylenth, but have a ton of other synths: spire, serum, ultra analog, arturia, u-he, ana2.)

Another quick thought re the sub bass – it appears you only want the bottom two octaves – how is this different than using an additive synth patch with only the fundamental and first harmonic present?

Glad I found this tutorial its a god send !

Beautiful.

like the detailled way you explain the single parts

1 Like

If you want become a trance producer, this is a top notch course by James Dymond. A lot of useful tips. Great workflow and the essentials to make the next step. Loved the whole course. Thank you James!

1 Like

James Dymond knows how to PRODUCE and how to TEACH. Early episodes here include a good “wrapup summary” at the end of each tutorial chapter of the major highlights covered in each segment; don’t let the overall running time throw you - the material is expertly, efficiently and gently presented, especially in terms of detailing “why” certain processing needs to happen in building a good foundation, one of the most crucial being the API EQ on the kick/drum buss, among others… You can find easy tutorials on “mid-bass” sound design on youtube – it’s hard to do EVERYTHING in one course without making it like 14 hrs… here you learn so much that is transferrable to all music production. Bravo!

1 Like

great course - I deviated a bit but the fundamentals here were crucial in helping me develop my take, a cover version of Neil Young’s “Old Man” - thanks James Dymond - I have to still watch the last tutorials on arrangement/mixdown… I got impatient with myself, lol - I have a clinical diagnosis of ADHD. And LOL.

Excellent course, very well structured and designed for beginners! Learnt SO much with this! Thank you JD!

Absolutely amazing course

revisiting James on this one - very good tutor

2 Likes

Revisiting this one 3 years later. If this thread is still monitored, I had one question about the Sub in Chapter 04, namely the cuts and boosts made with the EQs and the subfilter. – These settings were ideal when the Sub is playing in the root key of E. – The problem and question I had is about the Sub Progression, which also plays in C, A and D.

The problem I run into with sub progressions, is that even with many multi-samples, the volume/loudness and sometimes the dynamics changes with each note. – The EQ and filter settings can somewhat exacerbate this by making the root key louder. – I can’t recall if this was addressed in any chapters after the Sub Progression appeared in Chapter 13.

Automating the EQs to change with each key was a bit meticulous. Duplicating the channel three times to process each individual note with its own settings feels like overkill. – Only other option I can think of its rendering the settings with the root key, and then transpose the sample via a frequency shifter.

– TL;DR, I’m just seeking to have all of the notes in the sub progression playing just as loud as the root note. Cheers.

I won’t bother that much and try to get this surgical unless the bass line progression is conflicting with other elements in the track TBH. Using tools such as Volume Envelope shaper or a compressor and a limiter at the end of the bass channel FX chain should help to even loudness across different bass notes.

Some variation can also help to add movement and life to a track, the more you try to keep each and every note under control, the more your track might sound digital at the end of the day.

All depends of the impact of those perceived loudness variations on other channels or in context with the final mix, if it’s really an issue after trying to even the bass line progression with effects, then rendering the track to audio and tweaking further by editing audio regions, or just doing some volume automation on this audio track, might be easier than trying to get a perfect result with your effect chain in the first place.

Too much control and perfection isn’t always desirable IMHO, the real questions are “How does it sounds in the end ?”, “Is this really causing an issue in the final Mix ?”, “Do I really need to adjust and tweak further ?”

Thanks for the reply,

So firstly,
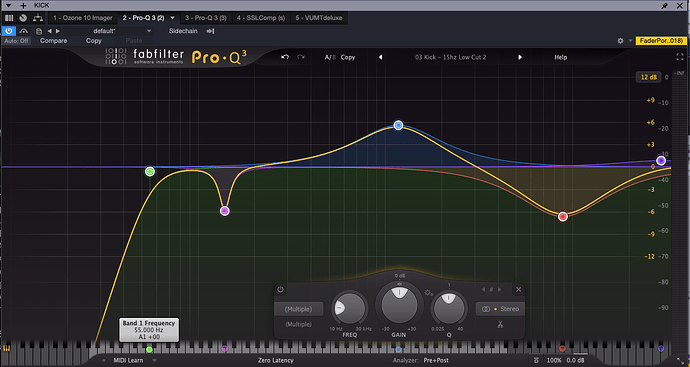
The solution I found was having each note of the Sub on its own sampler channel, and those channels within a Sub BUSS. The Pro-Q3 made it much easier to transpose the EQ settings. All that’s needed after duplicating the EQ insert is selecting all nodes, and moving them left or right. – For example if the root note/ key of the track is an A, and the rest of the progression being an F and a G, one simply moves all nodes over by -4 and -2 semitones (using the keyboard). The bx_subfilter if used might need to be set manually.

(To avoid copyright conflicts, I moved the Kick EQ around randomly, the frequencies in the screenshot aren’t important, I just needed to illustrate selecting all notes and moving them via the keyboard below.

I had a few thoughts on the perfectionism idea.

I won’t debate whether I am one or not, but if I am one, it would be because everything I did before I saw these tutorials, simply wasn’t working or wasn’t good enough. If there are any aspiring artists reading this that spent hours, nights, days, weeks, months, tweaking a track before finally sending it to a few respectable labels…without hearing any response. Well…you aren’t alone on that.

We all have our strengths and weaknesses. While I can easily bang out chord progressions and leads blindfolded, I literally have to go step by step on the kick, sub, mid-bass, and kick & bass buss. I’m decent with mixing, but I hate the arrangement and automation part. I have ADHD and focus/ organization is something I collect monthly disability for, lol.

The Sub Progression, is one thing I received feedback on. The tracks I submitted to Vandit and whatever other labels years ago, I was able to get feedback from Mark Sherry because of his mastering service. The critique was that the sub-bass was a bit weaker when playing notes, other than the root tonic. And that while not as noticeable on his monitors, that it would be noticeable on larger club and festival systems. The rest of the feedback was something about being selective with third party EQs and plugins that might have higher latency or phase-shifting as they can cause phase issues in the mix down. (That’s what I might call perfectionism…but someone with his background might call necessary)

I mean, my friends have said that word ‘perfectionism’ but… a track either meets a respectable label’s standards for being ‘release-ready’ or it doesn’t.

As far as that goes, James Dymond’s tutorial is the most helpful on the surgical. I’m in Giuseppe’s masterclass, and while his is better than Armin’s, his content mostly focuses on the creative and sound design, he doesn’t go as deep as James Dymond on surgical and post-production. So…I’m finding that combined the information from GO’s with JD’s is helping with a few breakthroughs.

Sorry for the length… I mean, its not like its my life’s work or anything, lol (yeah, it is)

Excellent course, everything was explained & reasons for doing it. Definitely recommend.

1 Like

Best ever “How to make” a track for the trance genre. Great course and an even greater template! Sure there are some third party plugins involved but that is something you can’t avoid if you want a production competing with the pros. Stock plugins can take you to 95% if you know what you’re doing (check the newer course from Trance Takeover 2023 from James) but if you want the polish of the 5% check this one!

1 Like

near the end of tutorial 6 kick and bass bus, you do the parallel compression - and your cpu hit is really low overall - did you bounce/freeze before hand or your system is super robust? my system setup is no slouch - thanks James Dymond amazing work I love your FL Tut’s you are the man!

i really appreciate James Dymond’s meticulous attention to detail - I never got such good mileage outta my fl studio after a lifetime of free updates = as now