Need Feedback for a Deep House Track

After watching (and reproducing) some tutorial here for the last 3 month i tried to accumulate all i learned. But now i am too close to my own work, so i need feedback from other persons. Tried to follow mixing and mastering lessons, but i am not sure if everything is right.

Especially need some more “groove” in part 2:35 to 4:40, but i don’t know how.

Here the Track:

https://soundcloud.com/lobotonie/fireflies

Could be a good start, was happily surprised by this kind of vocal effect you bring in at 1:34 and then from the break at 2:04 until almost the end because of the low pad and other synth elements you’re adding. I was missing some textures or background layers at the start, it could be just one note of that low pad that you could slightly bring in with level automation. That main lead on it’s own is lacking of effects like reverb, delay and filtering automation. I think those could really bring it more to life. When you start to layer more synths in different frequencies register, you’re occupying more of the full spectrum, so it’s more interesting. That higher freq. range synth we can hear through the end could be more present before.

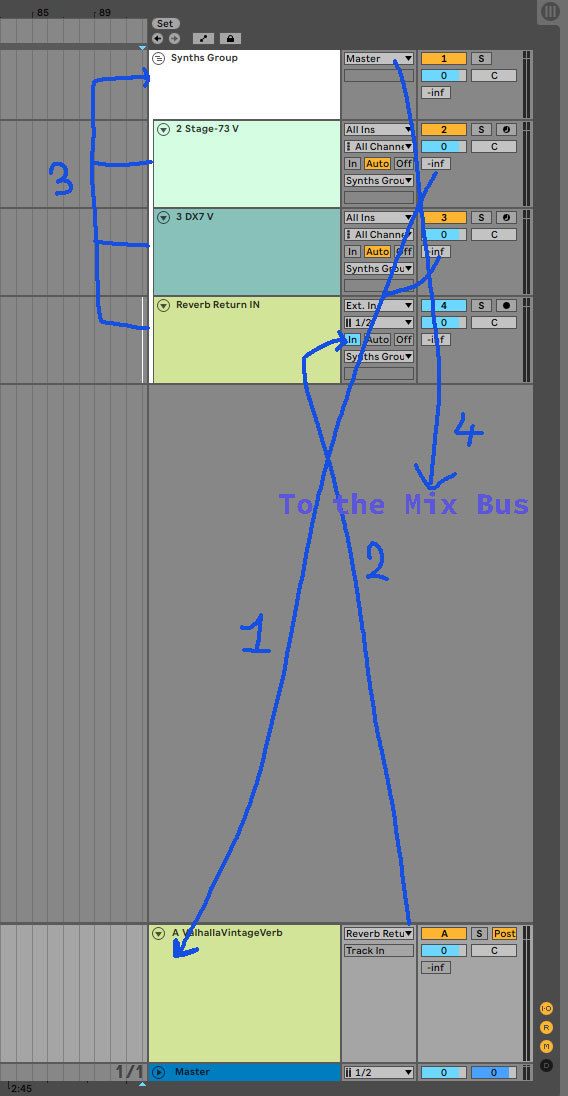
That’s for the synths, try to send this lead to a delay first and then add reverb and you’ll get a fuller/wider layer out of it.

I’m missing some Fx & transitions elements, white noise and some percussive effects are good to add this, it helps the listener’s mind to “follow” the arrangement, it creates interest and it fills the gap when you have less playing elements.

Well, groove wise speaking, I think that the weakest point of the track is the beat. Those hats through all the duration of the track is something not working for me. It’s way to prominent & loud, has got too many low end and it’s completely linear and repetitive in the pattern though it looks like you tried to do some panning automation with them ? ( not sure ). But in the end it sounds more like a ride than hats, and you won’t play a ride during a all track. I’m missing some 16beats hats, a tambourine loop or anything different than the main kick / hats pattern. A distinguished snare and some claps or other percussive elements would do a lot to enhance the groove too.

The bass could be a bit more present and punchy, layering another synth with it as a response could be something to try as well.

Clarity and levels wise, it’s quite a good job, maybe that bass could be a bit louder and that higher freq. range synth I mentioned before too, but you have to fill the gaps with effects, noise and use more filtering and transition elements to create tension and interest.

That’s a good result for this short period of time, and that’s a normal issue to get too much “closed”, trapped into your track and sound, it’s more than just being close to it :slight_smile:

Are you working with a reference track ?? I’m not sure, you should find one and compare your mix to it, it would help you to hear and see what’s missing.

Take regular and long enough breaks, try to work on something else and get back to this one after a while or listen to other music if you feel like you have to take some distance from this track. But referencing your work against a track that pleases you is a good habit. You can also deconstruct the reference track to analyze it’s elements, what was done in order to create tension, release and interest. Talking about this, if you haven’t watch the Enamour “Ruby” tutorial yet, I highly recommend you to do so. Even if the genre is different, the workflow and techniques used in this tutorial is really a gold mine for bringing a track to life. Reaching video N° 2 & 3, you could think that the track is already done, just with a synth, bass and pad + the drums… But it’s really amazing how Enamour is then paying attention to details, automation and adding more and more small but effective elements that make all the difference by the end.

The course is here if you haven’t watched it yet : How To Make Ruby with Enamour | Tutorial 01 - Introduction and Playthrough

Ok, that’s it for me and my 2cents feedback, hope this could be helpful, and let’s see what other members comment, though that it’s not always very busy when it comes to feedback, that’s why it’s also good to put it on SndCld, make it listen to friends and family and any reliable, honest people with “ears” and the mind for it. :wink:

Cheers !

Thanks for the reply and suggestions.

I always thought there is too much delay/reverb in the main, so i reduced it, also thought the ambient was too present, maybe i reduced it too much and add more texture.

Good suggestions for the groove part. I will rework this after getting some “distance” to the track. Also i will have a close look for the suggested tutorial.

Are you using the plug-in synth built in effects to set your reverb & delays ? It can be a good solution to keep them more dry from the synth and to send them to dedicated return/effects channels with the amount you need + the benefit of setting EQ, filters , compression … on that effect channel.

Yea, take it easy, you have to experiment things and there’s a lot to learn before being happy with the results. It’s important to keep the fun & interest, don’t put you under pressure with focusing on one track and trying to make it perfect. New techniques and music ideas will come along the way with practice :slight_smile:

For the main i used the Arturia Stage 73 Synth with deactivated build in plugins ins. Ableton Midi Track after the synth plugin i used Abelton build in Ping Pong Delay, AutoFilter and the Valhalla VintageVerb plugin (which i really start to like), all automated. I prefer not to use Send/Return Tracks, because there will be too much Return Tracks. Instead i use a Effect Rack with one dry and one wet channel.

Also doubled the main melody with a DX7 also with Ping Pong and Vintage Verb in the second part.

One problem with reverb is to find a setting, where the reverb isn’t sounding too metallic.

Yeah, i noticed a progression for every new track i made. Happy to get some constructive and in detail critics. :slight_smile:

But like i said before, the hardest part for me is to get a groove feeling. Just using swing is not enough. Tried to use LFOTool, PanCake2 and Gatekeeper too, but just started experimenting with this plugin.

Thanks for all the suggestions.

1 Like

Already some good habits & tweaks in Live I see, that’s cool :slight_smile:

When layering synths ( or other sounds ) in Live this routing can help you to glue & mix the different layers + the effects, but your technique is good too, in fact Live is so flexible for I/O & routing that you could do things in different ways. This method is using return channel again, but because of the routing you’ve got several points of control on your synths layers and effects.

1 - First you control the amount you want to send to the return via the Sent level.

  • Using the return channel : You can set filters, EQ, compressor, delay… with your Reverb ( or whatever effect ) , especially filters, EQ & compressor before the Reverb to control what frequencies you allow to pass through the reverb.

2 - If you route the output of the return channel to an audio track set to IN, you can further control the level of the reverb and you can again use EQ and other tools on this audio channel to refine or automate the effect.

3 - If you Sum all your synths channels layers + the audio track receiving from the Return Channel to a GROUP, you have one more place to add effects or automation to all those synths ( that’s where you can Glue sounds with compression, fine EQ again …etc )

4 - You can choose to send all your Groups to the Master or to another Audio Channel set to IN that could be called a Mix Bus or Pre-master, disabling the Audio IN channels for returns inside each group give you the option to Print/listen to your Dry Mix, making them active again gives you the Wet Mix.

Just another way to do things, I find it suitable when layering different synths, not saying you have to do it :slight_smile:
you can do a lot with Audio tracks set to incoming audio and I/O routing in Live.

As for the “swing” thing and the groove, a very basic parameter that is often missed is to play with midi notes velocity and length and also enable & use the Live “Track Delay” feature. Some “Random” Live Midi Effects combine with slightly different samples ( especially for drums ) could give great “humanized” results too. Another tip from Enamour in the video link ( check around 10:40 )

Have fun, looks like you’re digging it anyway so that’s great, happy mixing :slight_smile: